Before taking the car apart, you need to decide what kind of car you want: Show Car? Everyday Driver? V8 Conversion? I wanted something that would look nice with some modern convenience; I wanted to be able to drive the car AND be able to make some money if I decided to sell it. So (drum roll, please)…this will be a mostly stock, original-ish frame-off restoration. So let’s get started.
Assessing the condition of my new toy car:
This particular 1967 TR4A IRS spent most (if not all) of its life in the high desert of Southern California. It was, therefore, in pretty good condition rust-wise – it was not, however, in as great condition when it came to the interior, paint, seals, gaskets, top, seats, dashboard, etc. since it basically sat in a shed for 14 years. The engine had some new parts and came with the possibly spurious promise that ‘the previous owner rebuilt it’. It didn’t smoke, knock, ping, or otherwise sound bad so I took it at face value, knowing most of the motor needed to be taken apart anyway to replace leaky seals/gaskets – but we’ll get more into that later. It had 71,577 original miles and, based on the condition, I didn’t (and still don’t) doubt it. Right now, I’ll focus on the body and get to other parts in subsequent posts.
A visual inspection only revealed one small rust hole in the bottom of the right front fender that carried through to the rocker panel. Seriously? Just one, small bit of rust? Tapping around and feeling behind panels was just as promising. How much rust and filler was hiding under paint or otherwise not seen?
Tip #1: A little magnet will uncover more about a car’s history than anything else. Since a magnet will not stick (or at least not stick as well) to filler/Bondo, it’s a great tool to check the condition of your body panels. You can easily roll one of those little, round magnets around wheel wells, across rocker panels, or in any other suspicious-looking areas on the vehicle. And, since it rolls, you won’t leave scratches on the paint (good for not angering owners when you’re checking out a car for purchase).
The magnet revealed some filler in the hood (bonnet, if you’re British) and around the right front wheel well, both of which were attributable to dent/ding/repairs rather than rust.
All in all, the total body damage assessed was:
- Right Front Fender/Rocker Rust
- Right Front Fender Body Filler (assumably from a dent)
- Hood Damage/Repair/Filler from Weld Fracture (due to frozen hood hinge)
- Surface Rust and Filler on Hood around Headlamp Arches
- Floor Dents from Misplacement of Jack
- Slight Trunk (Boot, if you’re British) and Rear Valance Damage (presumably from a minor rear end collision)
- Surface Rust in Trunk
- Various Dents and Dings
The consensus for the body: I couldn’t believe it was a ‘67. 42 years old with only about 4 square inches of rust? I hated to admit it, but this car’s body was in better shape than mine. This theme continued as I disassembled the car.
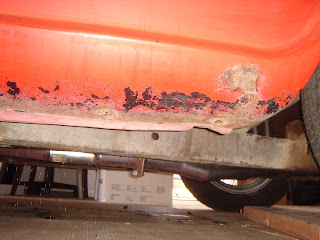
These pictures, taken on March 31st, show the condition of the body. It had been repainted a few times and much of the poor-quality black paint was peeling away under the hood and in the trunk.
Lonely Rust on F/R Fender
(Black is Primer)
Solid L/F Fender

Filler on R/F Wheel Arch

Damage & Shoddy Repair on Hood

Solid, Denty Floorboard

Rear Trunk/Valence Damage

Slight Surface Rust in Trunk Floor (and bad paint job)

Just a Shot Showing Alignment of Left Door/Fender


No comments:
Post a Comment